


It’s glorious, that first bite of a warm pastrami sandwich on freshly baked rye. If you’ve ever eaten pastrami at a great Jewish deli, you know what I’m talking about. That moist, tender meat topped with spicy mustard is enough to make almost anyone swoon. When my husband and I took the Queen Mary from London to New York several years ago, we docked at 6:00am and found that we were hungry. Our first stop? Katz’s Deli for a pastrami on rye. It didn’t matter that the sun was barely up. Pastrami is good any time, day or night. When the appetite strikes, you must feed it. Trouble is, many of us don’t live close to a great Jewish deli, and mediocre pastrami can be SO disappointing. What can you do? Make it at home, that’s what!
I’ve tried my hand at homemade pastrami several times with varying degrees of success. It wasn’t until a publisher sent me a review copy of The Artisan Jewish Deli at Home that I finally found a recipe worth blogging about. In their fabulous cookbook, authors Nick Zukin and Michael C. Zusman give workable home kitchen recipes for many Jewish deli favorites. In addition to uncovering the secrets of making these classic recipes at home, Nick and Michael delve into the traditional techniques used in deli kitchens. They also include nostalgic profiles of the most famous deli establishments in North America, including Katz’s in New York and Mile End in Montreal.
Nick Zukin helped to open Kenny & Zuke’s Delicatessen in Portland, one of the first Jewish delicatessens “focused on producing artisanal eats.” Michael C. Zusman is a state court judge who also does freelance food and restaurant writing. His bread recipes are currently used at Kenny & Zuke’s.

Deli-style pastrami emerged in New York during the late 19th century and remains a best seller on most deli menus. Because of its lengthy and laborious process, very few delis still cure and carve their own pastrami. Zukin and Zusman have whittled down the process to a very simple, doable recipe that requires relatively little effort. After making a simple brine the meat cures in the refrigerator for 5 days, then it’s rubbed with a spice blend and left to cook in a slow oven for a few hours. According to the authors:
“Delicatessen aficionados might cringe at the idea of making pastrami in the oven, since wood smoking is supposed to be the customary cooking method. At least that’s what they think. In truth, some of the most lauded pastrami and smoked meat involve no wood smoke at all. In his must read chronicle, Save the Deli, David Sax reveals that the smoky flavor in commercially produced pastrami comes from fat dripping down and sizzling on the gas element of the large ovens that are used.”
Side note: I love Save the Deli, I actually covered it on the blog a few years back.
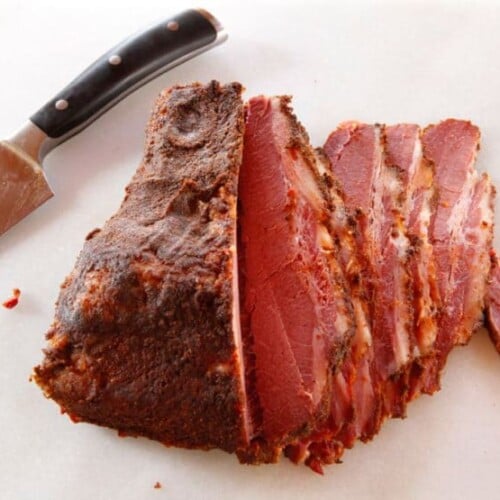
To add that smoky flavor to the brisket, Zukin and Zusman use a hefty dose of smoked paprika (one of my favorite spices!). The result is delicious, quality pastrami hot and fresh from your own oven. My house smelled just like a deli while it was cooking. The flavor and texture were delightful– tender and flavorful. I tested the recipe multiple times just to make sure it wasn’t a fluke. It’s not. This is some killer pastrami.
I stayed pretty true to Zukin and Zusman’s recipe, though I did adapt it slightly by cutting back on the salt. My first test round was extremely salty– good for a bite or two, but if I’d eaten a few slices I would have puffed up like a balloon. The next testing round I cut the kosher salt in the brine in half. I thought it might be too much and that I’d have to add some back in, but half the salt actually provided the perfect flavor. My five dinner guests taste-tested it for me, and they all agreed that the lower sodium brine it was plenty salty. So I present the recipe with the kosher salt halved; if you prefer to try it as written in the cookbook, use 2 cups of kosher salt in the brine.
Update: Nick Zukin let me know in the comments that they used Diamond large crystal kosher salt, which has less salt per cup than Morton’s. I didn’t realize that salt content varies from brand to brand. I am updating my recipe instructions to reflect the brand of salt we used. Thanks to Nick for the heads up!
Don’t be daunted by the long prep time, the preparation is actually very simple. Most of the time here is spent on curing the pastrami in the refrigerator. After that it’s no more difficult than roasting a brisket on a rack. The results are totally worth the wait. I have to hand it to Nick Zukin and Michael Zusman, this is a genius recipe. Their book has a lot of other great recipes for Jewish deli classics including Classic Deli Sandwich Rye, Onion-Poppy Seed Bialys and Cabbage and Smoked Meat Borscht. If you love deli food like I do, check out The Artisan Jewish Deli at Home. You’ll be glad you did!
What’s your favorite place to get a hot pastrami on rye?
Recommended Products:
Artisan Jewish Deli at Home
Stock Pot
Pink Curing Salt
This post may contain affiliate links which won’t change your price but will share some commission.
We are a participant in the Amazon Services LLC Associates Program, an affiliate advertising program designed to provide a means for us to earn fees by linking to Amazon.com and affiliated sites. As an Amazon Associate I earn from qualifying purchases.
Homemade Pastrami
Learn to make delicious deli-quality pastrami at home with this simple and tasty recipe, adapted from The Artisan Jewish Deli at Home cookbook.
PRINT RECIPE
Email Me Recipes
Servings: 16 servings
Ingredients
- 3 quarts water
- 3/4 cup Morton’s coarse kosher salt (178 grams) OR 1 1/3 cup Diamond Crystal Kosher Salt (181 grams) – these two brands are NOT interchangeable, the same weight provides two very different cup measurements
- 2 teaspoons pink curing salt (12 grams) – Pink curing salt is also known as Prague Mix #1, Instacure #1 or Curing Salt #1 – NOT Himalayan pink salt. See safety note below.
- 1 cup granulated sugar
- 2 tablespoons pickling spice
- 1 tablespoon whole coriander seeds
- 1 tablespoon whole yellow mustard seeds
- 4 cloves garlic (minced)
- 5 pounds beef brisket
Spice Rub Ingredients
- 1/4 cup ground coriander
- 2 tablespoons freshly ground black pepper
- 2 tablespoons smoked paprika
NOTES
You will also need: large stockpot, 2 gallon container with lid or two 1 gallon containers, 12 by 15 inch roasting pan with rack
Notes on this recipe adaptation: Originally this recipe was posted, as it was published, in “The Artisan Jewish Deli at Home” cookbook. After hearing feedback on the amount of curing salt called for in the recipe, I wanted to dig deeper. I reached out to my friend, Professor Ken Albala, a food history professor at the University of the Pacific. Ken cures meat regularly, and understands better than I do the inner workings of meat curing. I had him re-develop this recipe to include far less curing salt, while still capturing a delicious pastrami flavor. In Ken’s development process, he also cut the honey and brown sugar in the original recipe to better balance the flavors. Ken’s curing process takes longer than in the original recipe, so you’ll need a bit of patience — but it requires far less curing salt, and still achieves an excellent flavor profile. It is worth the wait.
Adjust Total Servings Note: It is not recommended to adjust servings for this recipe. Please make it exactly as written and measure ingredients carefully.
Regarding Nutritional Information: The recipe system on my site uses ingredients and number of servings to calculate the nutritional totals. Because the brine here contains a lot of kosher salt, it’s interpreting that as sodium in the recipe… but most of the brine is washed away before cooking, meaning most of the salt is washed away as well. I am not a nutritionist, and unfortunately do not know how much sodium is actually absorbed by this particular recipe. However, pastrami is salty (even without the brine). Safe to say, if you’re avoiding sodium, this is probably not the right recipe for you.
Instructions
-
To make the brine, fill a medium to large stockpot with 3 quarts water. Add the kosher and pink salts, granulated sugar, pickling spice, coriander and mustard seeds, and garlic. Bring to a boil over high heat, stirring often to fully dissolve the salt and sugar in the water. Immediately remove the pot from the heat once the brine boils.Add 3 quarts ice cold water to a 2-gallon or larger food-safe container that will fit in your refrigerator (you can also use a strong sealing 2-gallon marination bag – double bag for extra insurance). Pour the brine into the container and place it uncovered in the refrigerator until completely cool. You can also divide the brine evenly between two separate containers so that it will fit better in the refrigerator.
-
Trim the fat from the brisket until the fat layer is about 1/4 inch thick.
-
If necessary, cut the brisket in half so that it will fit into your container(s).
-
Submerge the brisket in the cooled brine.Allow the brisket to brine in the refrigerator for 10 to 12 days, flipping it daily top to bottom and stirring the brine. Make sure that if any of the brisket sides are touching one another you regularly turn them away from each other to expose all of the sides to the brine.
-
To cook the brisket, pour 4 cups water into the bottom of a 12 by 15 inch roasting pan. Set a rack inside the pan and place the brisket on the rack, fatty side down.
-
To make the spice rub, mix together the coriander, pepper and paprika in a small bowl. Evenly rub 1/4 cup of the mixture onto the top of the brisket. Then flip the brisket and rub the remaining spice mixture onto the fatty side. Allow the brisket to come to room temperature, about 2 hours.
-
Preheat the oven to 300 degrees with a rack low enough to fit the pan holding the brisket. Tightly cover the brisket and pan with a double layer of aluminum foil.
-
Bake until the meat reaches an internal temperature of 200 degrees, about 1 hour per pound or 5 hours total. Start checking internal temp at 3 hours and periodically every 20-30 minutes or so to avoid overcooking.
-
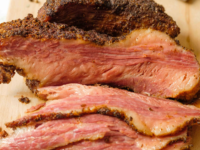
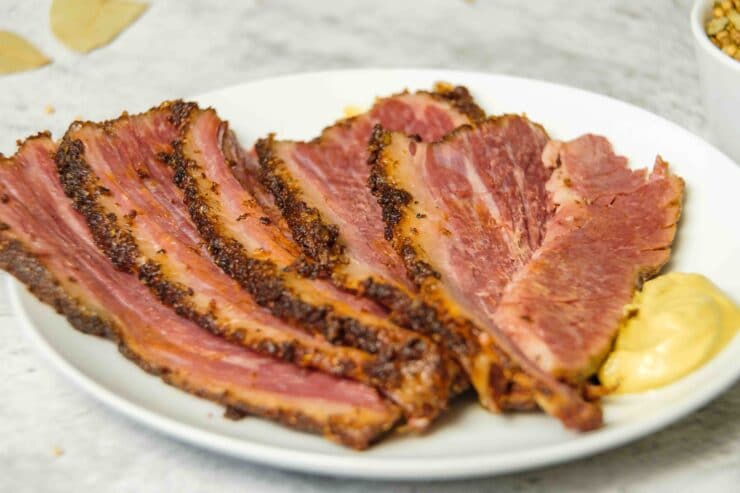
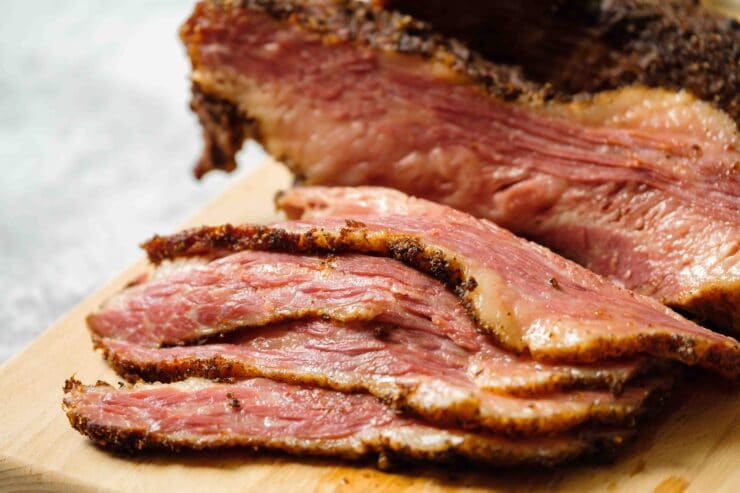
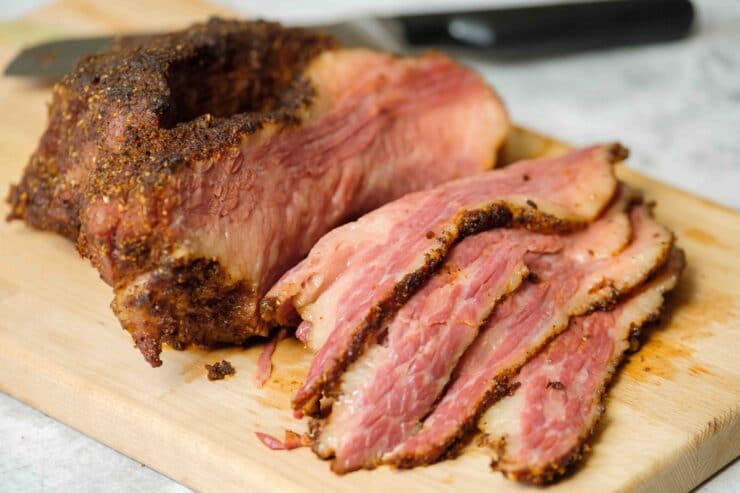
Without trimming the fat, carve the pastrami into 1/4 inch thick slices, or cut as thin as possible without the meat falling apart. Keep tightly wrapped, or in a sealed container in the fridge, for up to 1 week, or in the freezer for up to 6 months.
-
SAFETY NOTE: handle the pink curing salt with care and keep it out of reach of children. It is used in pastrami and other cured meats to kill bacteria, prevent botulism and add flavor. However it is extremely toxic if ingested directly; in fact, it’s colored pink to prevent people from mistaking it for regular salt. When used with care in recipes like this, it is very safe and necessary for proper flavor and food safety. That said, you should know the risks and keep the curing salt properly labeled and out of the reach of children.
Nutrition
Nutrition Facts
Homemade Pastrami
Amount Per Serving
Calories 243
Calories from Fat 54
% Daily Value*
Fat 6g9%
Saturated Fat 2g13%
Cholesterol 52mg17%
Sodium 7161mg311%
Potassium 505mg14%
Carbohydrates 27g9%
Fiber 1g4%
Sugar 23g26%
Protein 18g36%
Vitamin A 655IU13%
Vitamin C 21.5mg26%
Calcium 81mg8%
Iron 3.7mg21%
* Percent Daily Values are based on a 2000 calorie diet.

tried this recipe?
Let us know in the comments!
&n


